Welcome to the Quick Start Guide for the J2EE™ 1.4 Application Server! At this point, you have no doubt installed the server. (If not, see the online Installation Notes.)
This guide contains 3 major sections, each of which should take 10 minutes or less to complete.
In the first section of this guide, you'll start up the server and ensure that it works. Then you'll launch a small web application that uses JSP pages to say,"Hello". Here is the process you'll follow:
Note:
If you run into any difficulties, consult the online Troubleshooting
Guide.
The main section of the guide then concludes with these two "orientation" sections:
That finishes the first section of the guide. Two optional sections complete the guide:
To start the J2EE Application Server, follow the steps below:
Windows Solaris / Linux
- From the Start menu, choose
Programs
--> Sun Microsystems
--> J2EE 1.4 SDK
--> Start Default Domain
Hint:
For easy access later, right click on this icon and drag it to your desktop or to the top level in the Start Menu.
- Add the bin/ directory to the command path:
% setenv PATH <INSTALL_DIR>/bin:$PATH- Start the server:
% asadmin start-domain domain1
Note:
Windows users can run tools like asadmin from the command line, as well. The only difference is in how the environment variables are set. For details, see Configuring the Windows Environment to use the Command Line Tools at the end of this section.
A domain is a collection of configuration settings and deployed applications that run in an instance of the server. The first domain created during installation is domain1, in the directory <INSTALL_DIR>/domains/domain1. Other domains can be defined and started using the asadmin command.
A window appears telling you that the application server is starting. When the startup process has completed, you'll see an additional message:
Domain domain1 started.
Press any key to continue . . .
Press a key to close the message window, and you're ready to go on to the next step.
Later on, when you're ready to stop the server, you'll follow these steps:
Windows Solaris / Linux
- From the Start menu, choose
Programs
--> Sun Microsystems
--> J2EE 1.4 SDK
--> Stop Default Domain
- Issue the stop command:
% asadmin stop-domain
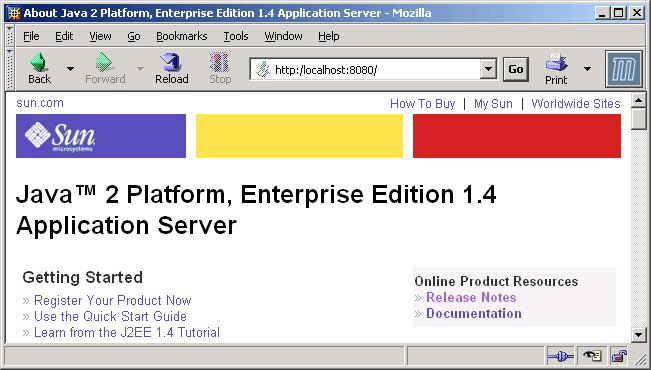
To make sure that the server is actually running on your system, follow this link:
This URL has two pieces:
When you click that link, you should see the server start page below. When you see this page, you know that the server is running.
If the server isn't running, and your system is operating normally in other respects, you'll get a "server not found" error. (In some browsers, that error automatically launches a search engine.) For deeper problems, you may need to check your server and browser settings, as described in the online Troubleshooting Guide.
Dragging or copying to a domain's autodeploy directory lets you put a pre-packaged application into use immediately, with minimal effort.
To deploy using auto deploy:
Note:
Depending on the speed of your system, it can take a little while
before the application is available on the server. If you get
a 404-File Not Found error when you try to visit the application
page, it's because the server hasn't finished loading the application.
To check, look at the autodeploy directory. If a file
named hello.war_deployed exists, then the application
is ready for use.
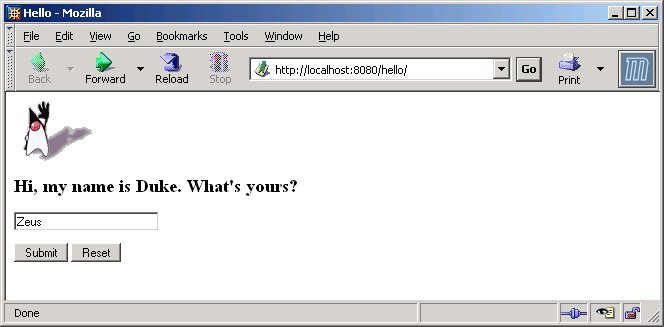
You should now see the application's first page, which asks you to fill in your name:
Type in your name, and click Submit.
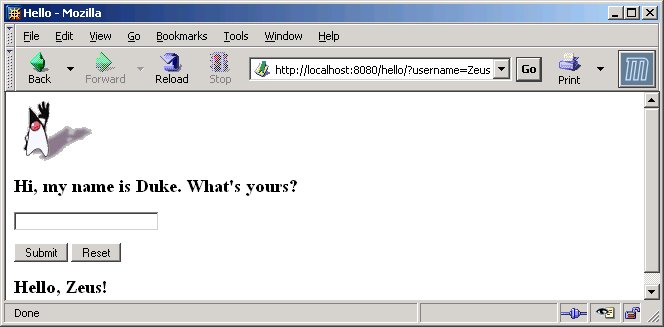
You should now see the customized response, giving you a personal "Hello":
Note:
You can also use the asadmin command line utility to deploy from the command line or in a shell script, which can be useful when you are setting up more than one machine. The command is asadmin deploy.
The Admin Console is convenient way to perform a variety of administrative functions. It's a web application that runs on the server, that's used to configure the server. You'll get a little practice with it later on in this guide, in View the Log File.
A variety of other tools are available, as well. Here is a summary of the tools that can be launched from the command line. (GUI tools are shown in bold.)
Tool Description appclient Launches the Application Client Container and invokes the client application packaged in the application JAR file. asadmin Application Server ADMIN tool. Used to configure the application server from the command line. asant Launches the Jakarta Ant tool, so you can automate repetitive development and deployment tasks. capture-schema
Extracts schema information from a database, producing a schema file that the server can use for Container Managed Persistence (CMP). deploytool Packages applications and deploys them on the server. jspc Compiles JSP pages. package-appclient
Packages the application client container libraries and jar files. verifier
Validates the J2EE deployment descriptors with the DTDs. (To see the GUI, specify the -u option. And note that on some windows systems, a driver verifier utility with the same name is launched. To get this Specification Compliance verifier, you must be in the <INSTALL_DIR>\bin directory.)
wscompile*
Takes the service definition interface and generates the client stubs or server-side skeletons; or generates a WSDL description for the provided interface. wsdeploy*
Generates an implementation-specific, ready-to-deploy WAR file for web services applications that use JAX-RPC. * These applications are found in <INSTALL_DIR>/share/bin, rather than <INSTALL_DIR>/bin. To access them, add that directory to your command path, as well.
Details on these tools are contained in the Admin Guide.
A tool can be launched by typing its name in a command window. (The Admin Console and deploytool have entries in the Windows Start menu, as well.)
To access the command line utilities, you'll need to add the server's bin/ directory to your path. To do that, follow the instructions below:
- From the Explorer window or desktop, right click on My Computer.
- Choose Properties.
The System Properties dialog appears.- Click the Advanced tab.
- Click Environment Variables.
- In the User variables section:
- If a PATH variable exists:
- Click Edit
- In Variable Value, enter the path to the server's bin directory, separated from other entries by a semicolon:
c:\<INSTALL_DIR>\bin;<other entries>- Otherwise click New:
- In Variable Name, type PATH
- In Variable Value, type the path to the server's bin directory:
c:\<INSTALL_DIR>\bin
Now that you've got the server running, you may want to visit one of the remaining sections of the Quick Start that go into slightly greater depth:
There are also a number of other places to go for detailed information:
The Admin Console is a web-based GUI that simplifies a variety of administration and configuration tasks. It is commonly used to:
In this section of the Quick Start, you'll see how to use it to access the log file.
Start by following this link to access the Admin Console:
where 4848 is the Admin Console's default port number. (If you changed the port number during the installation, use that number instead.)
Note:
Windows users can also use the Start menu option:
Programs
--> Sun Microsystems
--> J2EE 1.4 SDK
--> Admin Console
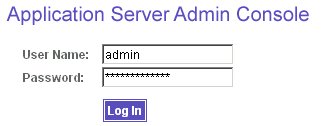
The Log In window appears. If you selected "Don't prompt for username" at installation, the username and password values are already filled in.
Click Log In.
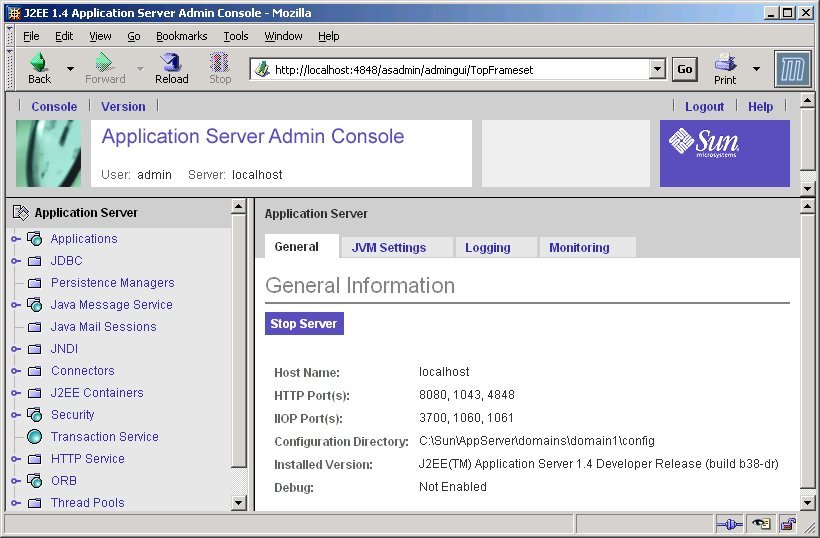
When the Admin Console appears, it looks like this:
At the moment, you're interested in the options that lie along the top of the information panel. You can use them to configure a variety of operational settings for the application server:
Click Logging to get to the logging options. The Logging Settings page appears.
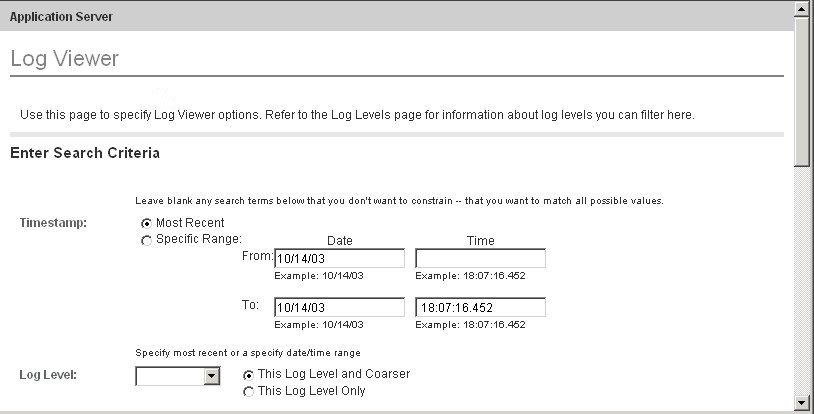
This page shows the location of the log file, and contains a variety of options to control which events are logged. You're not configuring the logging settings at the moment, though, so click "Log Viewer" to search and display information from the log.
The log viewer page contains a variety of selection criteria that you can use to select the latest and "most interesting" events that are captured in the log file. The default options are fine at the moment, however, so scroll to the bottom of the page and click Search.
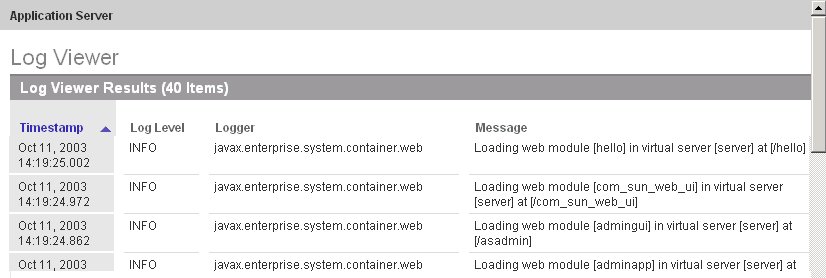
A log like the following is displayed, showing the most recently logged events. In this case, the most recent is at the top, showing that the application was loaded.
This ends the section. Now that you've had a preliminary look at the Admin Console, you can either continue to the next section, or return to Where to Go Next.
For simple web service applications, developers may choose to deploy directly from their development directory. But deploytool is highly recommended to configure more complicated J2EE applications that need security controls, context parameters, EJBs, property-group settings (for HTML templates), or database connections.
This section of the Quick Start provides only a cursory introduction to these procedures. For more information on them, see "Getting Started with Web Applications" in the The J2EE 1.4 Tutorial.
It's possible to deploy an application directly from a development directory, but only if the appropriate directory hierarchy and deployment descriptors have been created. That process is complex for non-trivial applications, so it's a procedure that is recommended only for for advanced users, or simple applications. But when it's feasible to do so, deploying directly from a directory can speed up the code and test development cycle.
The process can be performed both interactively, using the Admin Console, or by using asadmin deploydir from the command line or in a script. Here, we'll use the command line, since most developers will want to automate the procedure in command scripts.
To experiment with this process, go to <INSTALL_DIR>/samples/quickstart/and create a new directory, build/. Unzip the contents of the hello.war file into it. Be sure you preserve the directory structure of the WAR file when you unzip it -- it's a template for the kind of file structure you'll need to deploy directly from a directory.
Issue the following command to deploy the application:
asadmin deploydir <INSTALL_DIR>\samples\quickstart\build
Note:
You must specify the full path to the build/ directory.
The following message appears to confirm that the redeployment succeeded:
Command deploydir executed successfully.
You can now click on http://localhost:8080/build to access the redeployed application.
Manually configuring deployment decscriptors for a complex application can be a tedious, error-prone process. The deploytool utility smooths out the process, however, and is the easiest way to package and deploy all but the simplest of applications.
The deploytool utility lets you:
Go to <INSTALL_DIR>/samples/quickstart. The src/docroot directory contains the files used in the Hello World application. Create a new directory, build2, and copy the contents of src/docroot to it. The resulting directory structure should look like this:
The build2/ directory represents the kind of structure you would construct when you compile your application into WEB-INF/classes. But in this case, the application only contains two JSP pages and two files they reference. If you compare it's contents to the build/ directory you created in the previous section, you can see how much work deploytool saves you, even for a simple application.
In this section, you'll practice packaging the Hello World application using deploytool.
Begin by starting the deploytool utility:
Windows Solaris / Linux
- From the Start menu, choose
Programs
--> Sun Microsystems
--> J2EE 1.4 SDK
--> Deploytool
- Start the tool
% deploytool
When the login screen appears, enter your user name and password. (If you selected "Don't prompt for username" at installation, then those fields will be filled in automatically.)
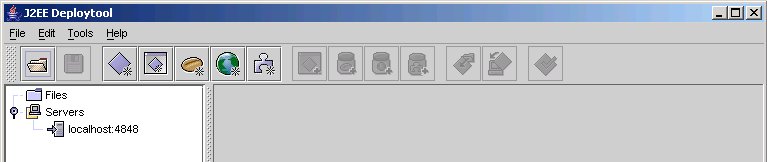
When the deploytool utility starts up, it looks like this:
The tree-structured panel at the left shows that no files are currently open, and the admin server is available to carry out deploy operations at it's default port number of 4848.
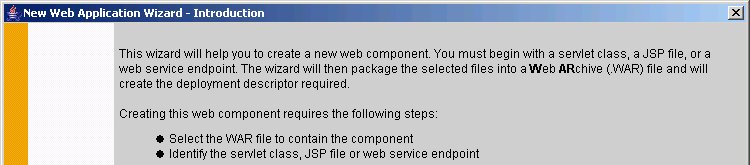
Now you're ready to do the packaging.Select File --> New --> Web Component. The wizard's introductory screen appears.
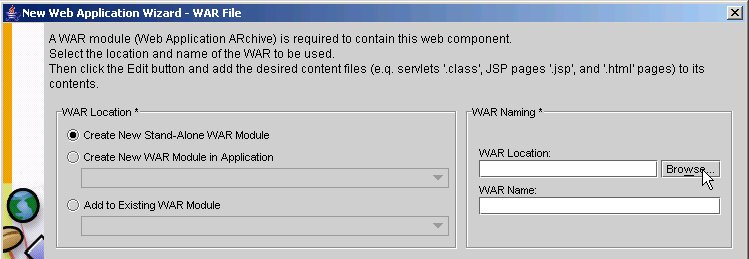
Click Next. The Wizard's main screen appears.
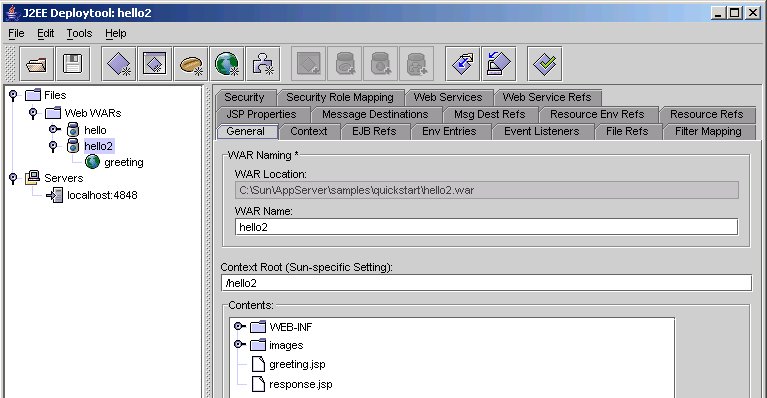
You'll be creating a new stand-alone WAR module, so the default selection is good. Click the Browse button to specify the name and location of the WAR file to create. Navigate to <INSTALL_DIR>/samples/quickstart/ and enter the filename as hello2.
Click "Choose Module File" to return to the Wizard.
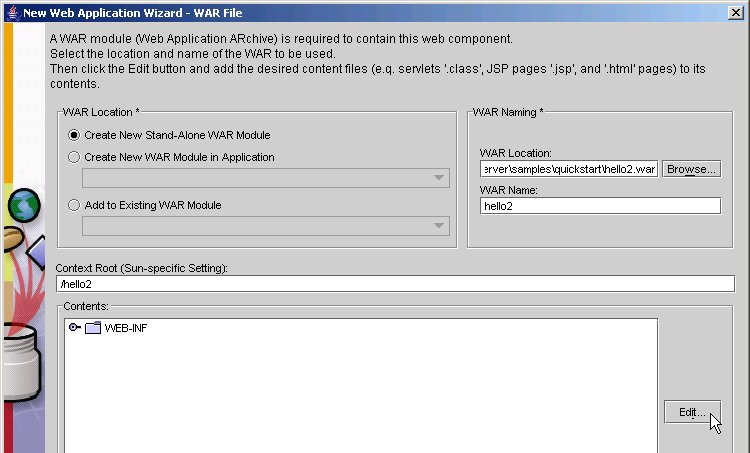
In WAR Name, enter hello2. That's name for the application that will appear in administration utilities like deploytool and the Admin Console.
In Context Root enter /hello2. That defines the URL for the web application as http://<server>:<port>/hello2. (In most production systems, of course, the application server uses a default port, so the port number isn't part of the URL that users type.)
The Wizard should now look like this:
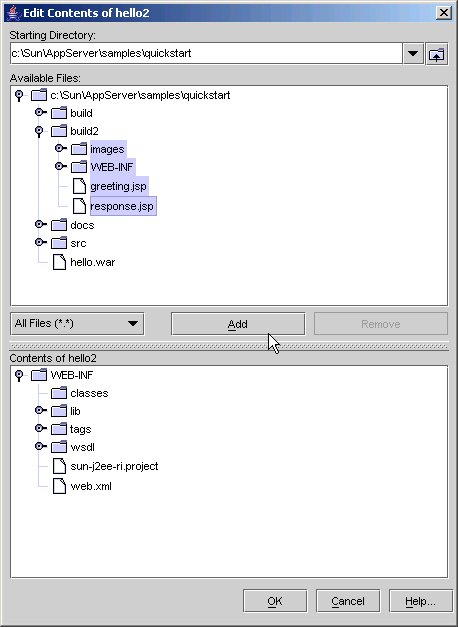
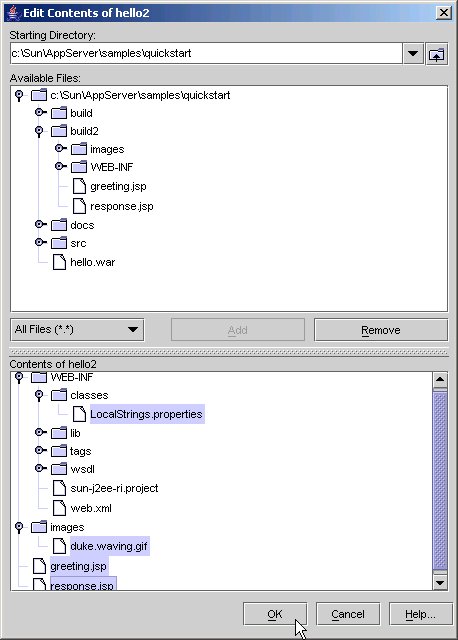
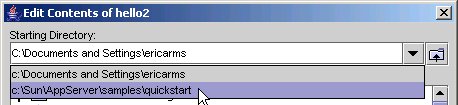
Click Edit to add the files that make up the application. The Edit Content dialog appears. Navigate to <INSTALL_DIR>/samples/quickstart/build2.
Note:
The starting directory won't be in a convenient location, at this point, but you can use the drop down list of shortcuts, as shown here:
In the build2/ directory, select the images/ and WEB-INF/ directories, as well as the JSP pages.
Click Add. The dialog shows that the selected files have been added.
Click OK to back to the Wizard's WAR-definition window.
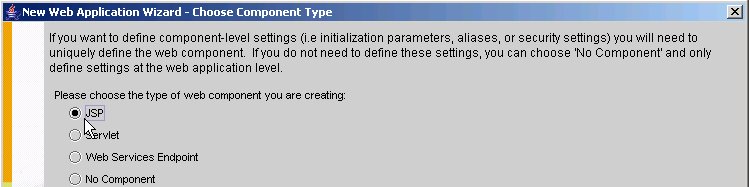
Click Next to complete the process of defining the WAR file. The Component Type dialog appears.
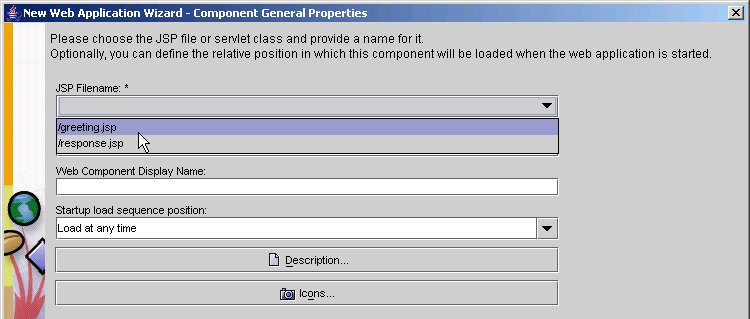
Select JSP and click Next. The General Properties screen appears.
Select greeting.jsp from the drop down list. This selection populates the other fields with default values based on the name.
Click Next and read the notes about the next steps you can take.
Click Finish to end the Wizard and return to the deploytool screen.
At this point, you need to select the applications welcome page -- otherwise, even with the application deployed, the URL http://localhost:8080/hello2 will simply display the contents of the /hello2 directory.
Note:
An index.jsp, index.html, or index.html file becomes the application's welcome page by default. But you can also choose the file you want for a welcome page by selecting the File Refs tab.
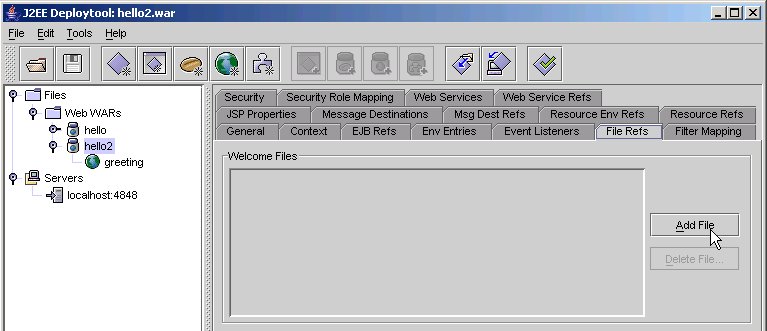
Select the File Refs tab to specify the welcome page for the application:
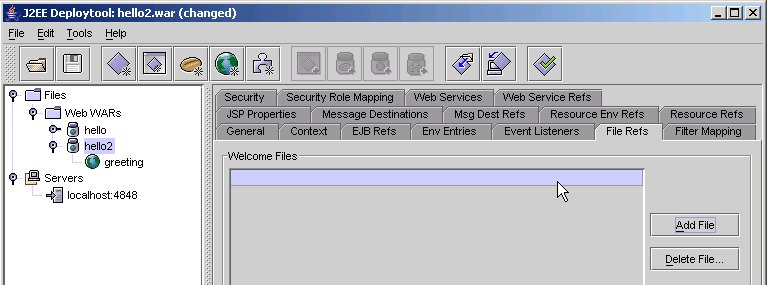
In the Welcome Files panel, click Add File.
An empty entry appears in the list. Click in it to activate the drop down list.
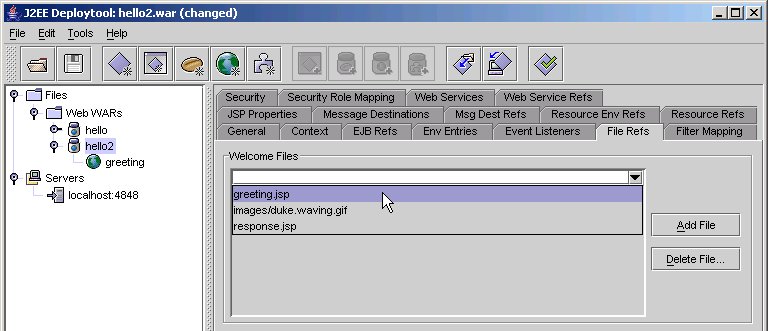
Click again to open the drop down list and display the list of files in the application. Select greeting.jsp:
Congratulations! You've just packaged a simple application. In the The J2EE 1.4 Tutorial, you'll learn how to package more complex applications, but the general outline of the process is pretty much the same. Now that it's packaged, deploying the application is an extremely simple operation. You'll do that next.
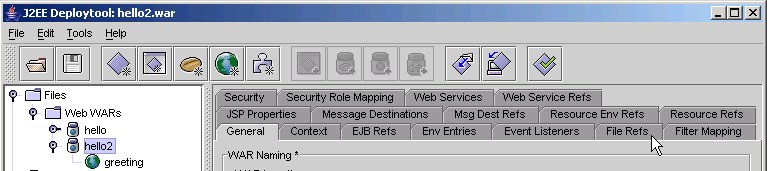
The deploytool utility now shows the hello2 application, and has it selected.
To deploy the application, choose Tools -> Deploy.
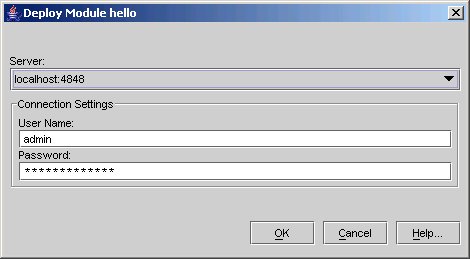
The security dialog appears. Supply the admin user name and password. (If you chose "Don't prompt for username" during the installation, then those fields are already filled in.) Click OK.
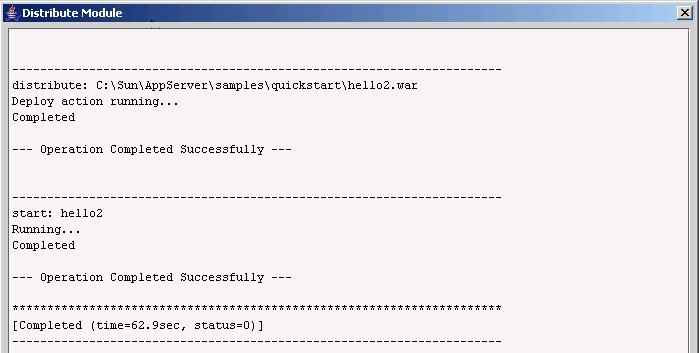
The server now starts loading the application. A dialog appears that keeps you informed of server's progress, so you know when the deployment operation has completed.
You can now verify that the application is running by following this link: http://localhost:8080/hello2.
This ends the section. Now that you've packaged and deployed an application with deploytool, you'll probably want to return to Where to Go Next.